[게임 수학] Chapter 13. 절두체: 최적화된 3차원 공간 (2)
Table of Contents
이득우의 게임 수학 책을 읽고 공부한 노트입니다.
바운딩 볼륨 #
- 절두체 컬링에서 게임 오브젝트가 절두체 영역에 걸쳐 있다면 그려줘야한다.
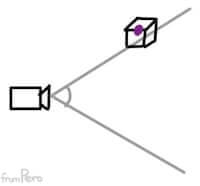
- 따라서 이 문제를 해결하기 위해서 게임 오브젝트의 위치를 대상으로 하지 않고, 메시가 차지하는 영역을 감안해 절두체 컬링을 해야한다.
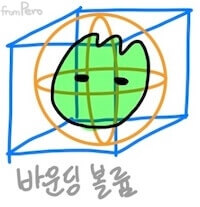
- 바운딩 볼륨(Bounding volume)
- 메시가 차지하는 영역을 효과적으로 관리하기 위해 구(Sphere)나 박스(Box)같은 원시 도형(Primitive shape)을 사용한다. 이렇게 원시 도형으로 설정한 공간 데이터를 바운딩 볼륨이라고 한다.
구 바운딩 볼륨의 판정 #
- 바운딩 볼륨에서 가장 손쉽게 사용되는 것은 구(Sphere) 다.
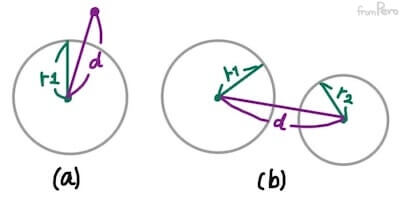
- 어떤 점이 구의 외부에 있는지(a)와 두 구의 영역이 서로 떨어져 있는지(b)의 여부는 반지름을 이용해서 쉽게 알 수 있다.
struct Sphere
{
public:
    FORCEINLINE constexpr Sphere() = default;
    FORCEINLINE constexpr Sphere(const Circle& InCircle) : Center(InCircle.Center), Radius(InCircle.Radius) {};
    Sphere(const std::vector<Vector3>& InVertices);

    FORCEINLINE constexpr bool IsInside(const Vector3& InVector) const;
    FORCEINLINE constexpr bool Intersect(const Sphere& InCircle) const;

public:
    Vector3 Center = Vector3::Zero;
    float Radius = 0.f;
};

// (a)
FORCEINLINE constexpr bool Sphere::IsInside(const Vector3& InVector) const
{
    return ((Center - InVector).SizeSquared() <= (Radius * Radius));
}

// (b)
FORCEINLINE constexpr bool Sphere::Intersect(const Sphere& InCircle) const
{
    float radiusSum = Radius + InCircle.Radius;
    return (Center - InCircle.Center).SizeSquared() <= (radiusSum * radiusSum);
}
- 다음은 메시의 모든 영역을 감쌀 수 있는 구 영역을 생성하는 로직이다.
Sphere::Sphere(const std::vector<Vector3>& InVertices)
{
    size_t cnt = InVertices.size();
    if (cnt == 0)
    {
        return;
    }

    Vector3 sum;
    for (const auto& v : InVertices)
    {
        sum += v;
    }

    // 모든 점의 좌표를 더한 값을 수로 나눠서, 중점을 계산한다.
    Center = sum / (float)cnt;

    // 중점으로부터 모든 점의 거리를 구하고, 이 중에서 가장 큰 값을 반지름으로 한다.
    Radius = (*std::max_element(InVertices.begin(), InVertices.end(),
        [&](Vector3 const& lhs, Vector3 const& rhs)
    {
        return (Center - lhs).SizeSquared() < (Center - rhs).SizeSquared();
    })).Size();
}
- 그렇다면 구를 이용해서 어떻게 절두체 컬링을 할 수 있을까?
- 앞서 보았던 평면의 방정식의 법선 벡터 $(a, b, c)$와 구의 중점 좌표의 내적값인 $p$에 $d$값을 더한 값인 $p + d$을 가지고 판단해보자.
| 조건 | 의미 |
|---|---|
| $p + d \gt r$ | $p + d$가 양수이면 구는 평면의 바깥쪽에 위치한다. 심지어 $r$보다 크면, 겹치지도 않았다. 완전히 바깥이다. |
| $|p + d| \leq r$ | 구는 절두체 평면과 겹쳐져 있다. |
| 나머지 | 구는 절두체 안에 있다. |
FORCEINLINE constexpr BoundCheckResult Frustum::CheckBound(const Sphere& InSphere) const
{
    for (const auto& p : Planes)
    {
        // 양수이고, 반지름보다 크면 -> 절두체 밖에 있다.
        if (p.Distance(InSphere.Center) > InSphere.Radius)
        {
            return BoundCheckResult::Outside;
        }
        // 반지름보다 작거나 같으면 -> 절두체 평면에 걸쳐있다.
        else if (Math::Abs(p.Distance(InSphere.Center)) <= InSphere.Radius)
        {
            return BoundCheckResult::Intersect;
        }

    }

    // 나머지 -> 절두체 안에 있다.
    return BoundCheckResult::Inside;
}
- 절두체 컬링에 사용하는 구 바운딩 볼륨은 로컬 좌표를 기준으로 생성된 데이터다.
- 하지만 우리는 절두체 컬링을 뷰 공간에서 진행하기 때문에 변환이 필요하겠다.
- 로컬 공간의 바운딩 볼륨 정보로 바로 절두체 컬링을 진행할 순 없을까?
- 클립 좌표는 다음과 같이 만들어진다.
$$\vec{v_{clip}} = (P) \cdot \vec{v_{view}}$$
- 만약 $\vec{v_{view}}$대신 $\vec{v_{local}}$을 사용한다면? 다음과 같이 모델링 행렬과 뷰 행렬을 사용할 수 있다.
$$\vec{v_{clip}} = (PVM) \cdot \vec{v_{local}}$$
// 렌더링 로직을 담당하는 함수
void SoftRenderer::Render3D()
{
    // 렌더링 로직에서 사용하는 모듈 내 주요 레퍼런스
    const GameEngine& g = Get3DGameEngine();
    auto& r = GetRenderer();
    const CameraObject& mainCamera = g.GetMainCamera();

    // 배경에 기즈모 그리기
    DrawGizmo3D();

    // 렌더링 로직의 로컬 변수
    const Matrix4x4 pvMatrix = mainCamera.GetPerspectiveViewMatrix();

    // 절두체 컬링 테스트를 위한 통계 변수
    size_t totalObjects = g.GetScene().size();
    size_t culledObjects = 0;
    size_t intersectedObjects = 0;
    size_t renderedObjects = 0;

    for (auto it = g.SceneBegin(); it != g.SceneEnd(); ++it)
    {
        const GameObject& gameObject = *(*it);
        if (!gameObject.HasMesh() || !gameObject.IsVisible())
        {
            continue;
        }

        // 렌더링에 필요한 게임 오브젝트의 주요 레퍼런스를 얻기
        const Mesh& mesh = g.GetMesh(gameObject.GetMeshKey());
        const TransformComponent& transform = gameObject.GetTransform();

        // 최종 행렬 계산 PVM
        Matrix4x4 finalMatrix = pvMatrix * transform.GetModelingMatrix();
        LinearColor finalColor = gameObject.GetColor();

        // 최종 변환 행렬로부터 평면의 방정식과 절두체 생성
        Matrix4x4 finalTransposedMatrix = finalMatrix.Transpose();
        std::array<Plane, 6> frustumPlanesFromMatrix = {
            Plane(-(finalTransposedMatrix[3] - finalTransposedMatrix[1])), // up
            Plane(-(finalTransposedMatrix[3] + finalTransposedMatrix[1])), // bottom
            Plane(-(finalTransposedMatrix[3] - finalTransposedMatrix[0])), // right
            Plane(-(finalTransposedMatrix[3] + finalTransposedMatrix[0])), // left
            Plane(-(finalTransposedMatrix[3] - finalTransposedMatrix[2])), // far
            Plane(-(finalTransposedMatrix[3] + finalTransposedMatrix[2])), // near
        };
        Frustum frustumFromMatrix(frustumPlanesFromMatrix);

        // 바운딩 영역을 사용해 절두체 컬링을 구현
        Sphere sphereBound = mesh.GetSphereBound();
        auto checkResult = frustumFromMatrix.CheckBound(sphereBound);
        if (checkResult == BoundCheckResult::Outside)
        {
            culledObjects++;
            continue;
        }
        else if (checkResult == BoundCheckResult::Intersect)
        {
            // 겹친 게임 오브젝트를 통계에 포함
            intersectedObjects++;
            finalColor = LinearColor::Red;
        }

        // 메시 그리기
        DrawMesh3D(mesh, finalMatrix, finalColor);

        // 그린 물체를 통계에 포함
        renderedObjects++;
    }

    r.PushStatisticText("Total GameObjects : " + std::to_string(totalObjects));
    r.PushStatisticText("Culled GameObjects : " + std::to_string(culledObjects));
    r.PushStatisticText("Intersected GameObjects : " + std::to_string(intersectedObjects));
    r.PushStatisticText("Rendered GameObjects : " + std::to_string(renderedObjects));
}
AABB와의 판정 #
- 구 영역 대신 박스(Box) 영역을 사용해서 좀 더 정교한 절두체 컬링 작업을 수행해보자.
- 구 바운딩 볼륨에 비해 계산량은 많지만, 좀 더 정교하게 절두체 컬링을 할 수 있어서 보편적으로 게임 엔진에서 활용된다.
- AABB(Axis aligned bounding box)
- 박스 영역을 생성할 때, 기저 축에 평행한 박스 영역이 형성되는데 이것을 AABB라고 한다.
- 다음은 로컬 공간에서 AABB 영역을 생성하는 코드이다.
struct Box
{
public:
    // ...
    FORCEINLINE constexpr Box operator+=(const Vector3& InVector);

public:
    Vector3 Min;
    Vector3 Max;
};

// 박스 영역의 최솟값과 최댓값을 저장한다.
FORCEINLINE constexpr Box Box::operator+=(const Vector3& InVector)
{
    Min.X = Math::Min(Min.X, InVector.X);
    Min.Y = Math::Min(Min.Y, InVector.Y);
    Min.Z = Math::Min(Min.Z, InVector.Z);

    Max.X = Math::Max(Max.X, InVector.X);
    Max.Y = Math::Max(Max.Y, InVector.Y);
    Max.Z = Math::Max(Max.Z, InVector.Z);

    return *this;
}
Box::Box(const std::vector<Vector3> InVertices)
{
    for (const auto& v : InVertices)
    {
        *this += v;
    }
}
- 그렇다면 로컬 공간에서 생성한 AABB 영역과 평면과의 판정은 어떻게 할까?
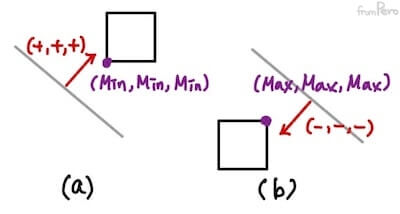
- (a) 평면의 법선 벡터의 모든 요소가 양수인 상황, AABB 영역이 평면의 바깥에 위치해 있다.
- AABB영역의 최솟값이 평면과 가장 가깝다.
- (b) 평면의 법선 벡터의 모든 요소가 음수인 상황, AABB 영역이 평면의 안쪽에 위치해 있다.
- AABB영역의 최댓값이 평면과 가장 까깝다.
- AABB 영역과 법선 벡터의 $x$, $y$, $z$축은 서로 직교하고 있으므로 각 축의 데이터는 독립적으로 동작한다.
- 따라서, 각 법선 벡터의 요소가 양수인 경우에는 최솟값을, 음수인 경우에는 최댓값을 사용하는 것으로 평면에서 가장 가까운 AABB의 점을 구할 수 있다.
- 평면에서 가장 가까운 AABB의 좌표와 평면과의 차이를 측정했을 때, 그 값이
| 조건 | 의미 |
|---|---|
| 양수 | AABB영역이 평면의 바깥쪽에 있다. |
| 음수 | AABB영역이 평면의 안쪽에 있다. 이때, 정반대의 점으로 다시 테스트를 진행했는데 양수라면, 서로 교차하는 것이다. 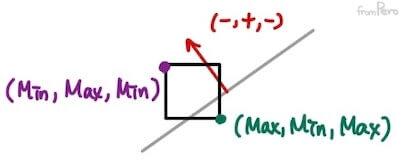
|
FORCEINLINE constexpr BoundCheckResult Frustum::CheckBound(const Box& InBox) const
{
    for (const auto& p : Planes)
    {
        Vector3 pPoint = InBox.Min, nPoint = InBox.Max;
        if (p.Normal.X >= 0.f) { pPoint.X = InBox.Max.X; nPoint.X = InBox.Min.X; }
        if (p.Normal.Y >= 0.f) { pPoint.Y = InBox.Max.Y; nPoint.Y = InBox.Min.Y; }
        if (p.Normal.Z >= 0.f) { pPoint.Z = InBox.Max.Z; nPoint.Z = InBox.Min.Z; }

        // 가장 가까운 점과의 결과가 양수이면 -> 바깥쪽에 있다.
        if (p.Distance(nPoint) > 0.f)
        {
            return BoundCheckResult::Outside;
        }
        // 음수인데, 정반대의 점과의 결과가 양수이면 -> 겹쳐있다.
        if (p.Distance(nPoint) <= 0.f && p.Distance(pPoint) >= 0.f)
        {
            return BoundCheckResult::Intersect;
        }
    }

    // 나머지 -> 안쪽에 있다.
    return BoundCheckResult::Inside;
}
- 다음은 AABB영역을 사용해서 절두체 컬링을 하는 코드이다.
// 렌더링 로직을 담당하는 함수
void SoftRenderer::Render3D()
{
    // 렌더링 로직에서 사용하는 모듈 내 주요 레퍼런스
    const GameEngine& g = Get3DGameEngine();
    auto& r = GetRenderer();
    const CameraObject& mainCamera = g.GetMainCamera();

    // 배경에 기즈모 그리기
    DrawGizmo3D();

    // 렌더링 로직의 로컬 변수
    const Matrix4x4 pvMatrix = mainCamera.GetPerspectiveViewMatrix();

    // 절두체 컬링 테스트를 위한 통계 변수
    size_t totalObjects = g.GetScene().size();
    size_t culledObjects = 0;
    size_t intersectedObjects = 0;
    size_t renderedObjects = 0;

    for (auto it = g.SceneBegin(); it != g.SceneEnd(); ++it)
    {
        const GameObject& gameObject = *(*it);
        if (!gameObject.HasMesh() || !gameObject.IsVisible())
        {
            continue;
        }

        // 렌더링에 필요한 게임 오브젝트의 주요 레퍼런스를 얻기
        const Mesh& mesh = g.GetMesh(gameObject.GetMeshKey());
        const TransformComponent& transform = gameObject.GetTransform();

        // 최종 행렬 계산
        Matrix4x4 finalMatrix = pvMatrix * transform.GetModelingMatrix();
        LinearColor finalColor = gameObject.GetColor();

        // 최종 변환 행렬로부터 평면의 방정식과 절두체 생성
        Matrix4x4 finalTransposedMatrix = finalMatrix.Transpose();
        std::array<Plane, 6> frustumPlanesFromMatrix = {
            Plane(-(finalTransposedMatrix[3] - finalTransposedMatrix[1])), // up
            Plane(-(finalTransposedMatrix[3] + finalTransposedMatrix[1])), // bottom
            Plane(-(finalTransposedMatrix[3] - finalTransposedMatrix[0])), // right
            Plane(-(finalTransposedMatrix[3] + finalTransposedMatrix[0])), // left
            Plane(-(finalTransposedMatrix[3] - finalTransposedMatrix[2])),  // far
            Plane(-(finalTransposedMatrix[3] + finalTransposedMatrix[2])), // near
        };
        Frustum frustumFromMatrix(frustumPlanesFromMatrix);

        // 바운딩 영역을 사용해 절두체 컬링을 구현
        Box boxBound = mesh.GetBoxBound();
        auto checkResult = frustumFromMatrix.CheckBound(boxBound);
        if (checkResult == BoundCheckResult::Outside)
        {
            culledObjects++;
            continue;
        }
        else if (checkResult == BoundCheckResult::Intersect)
        {
            // 겹친 게임 오브젝트를 통계에 포함
            intersectedObjects++;
            finalColor = LinearColor::Red;
        }

        // 메시 그리기
        DrawMesh3D(mesh, finalMatrix, finalColor);

        // 그린 물체를 통계에 포함
        renderedObjects++;
    }

    r.PushStatisticText("Total GameObjects : " + std::to_string(totalObjects));
    r.PushStatisticText("Culled GameObjects : " + std::to_string(culledObjects));
    r.PushStatisticText("Intersected GameObjects : " + std::to_string(intersectedObjects));
    r.PushStatisticText("Rendered GameObjects : " + std::to_string(renderedObjects));
}
삼각형 클리핑 #
- 지금까지 구현한 것에 문제가 있다. 카메라를 좌우로 움직이면 깨짐 현상이 일어난다. 이 문제의 발생 원인은?
- 거대한 삼각형이 카메라 앞뒤에 있다고 한다면, 카메라 뒤에 있는 점은 무한 원점을 중심으로 뒤집혀서 투영되기 때문이다.
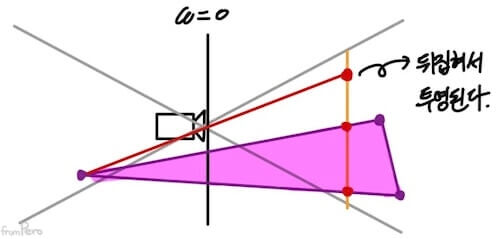
- 삼각형 클리핑(Triangle clipping)
- 원근 투영 행렬을 곱해 생성된 클립 좌표계의 $w$값은 뷰 공간에서의 깊이 값을 의미한다.
- 따라서 카메라 정면의 위치한 점은 $w$값이 $0$보다 크고, 카메라 뒤에 있는 점의 $w$값은 $0$보다 작으며, 카메라 초점에 위치한 점의 $w$값은 $0$이 된다.
- 올바르게 보이려면 카메라 뒤쪽에 있는, 음의 $w$ 영역에 걸쳐 있는 삼각형을 파악하고 잘라내야 한다. 이것을 삼각형 클리핑이라고 한다.
- 이 상황을 위에서 내려다 보자.
- 점 하나가 카메라 뒤에 있는 경우이다.
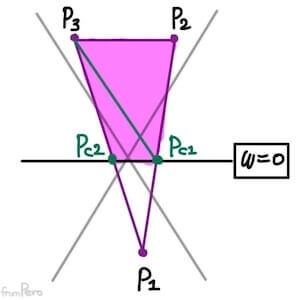
- Chapter 6에서 보았던 것을 사용해서 점 $P_{c1}$의 좌표는 다음과 같이 구할 수 있겠다.
$$ P_{c1} = P_1 \cdot (1- t_1) + P_2 \cdot t_1 $$
- 점 $P_{c1}$은 $w = 0$인 직선에 위치하므로 점 $P_1$, $P_2$의 $w$값을 각각 $w_1$, $w_2$라고 표기하면 다음의 수식이 성립한다.
$$ w_1 (1 - t_1) + w_2t_1 = 0 $$ $$ t_1 = \frac{w_1}{w_1 - w_2} $$
- 이 영역은 사각형이므로 두 개의 삼각형으로 분할해야 한다.
- 방향이 동일하도록 정점의 순서도 자르기 전의 삼각형의 순서와 동일해야 한다.
- 이번에는 두 점이 카메라 뒤에 있는 경우이다.
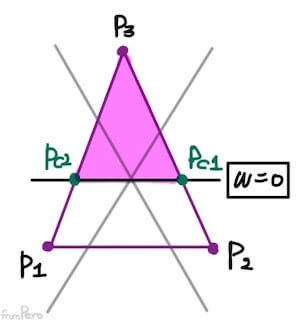
- 이 경우에는 결과가 언제나 삼각형이므로, 두 점의 위치 값만 갱신하면 되겠다.
- 세 점이 뒤에 있다면
- 안 그리면 된다.
- 이러한 클리핑 규칙은 절두체를 구성하는 모든 평면에 적용할 수 있다.
- 한 점이 카메라 뒤에 있는 경우, 그 다음 상황을 생각해보자.
- 오른쪽 절두체 영역을 잘라내면 다음과 같을 것이다.
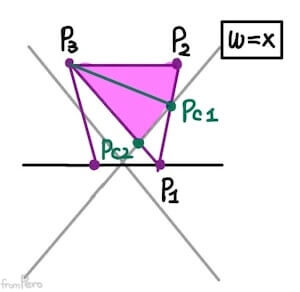
- 절두체의 오른쪽 평면은 NDC좌표의 x값이 언제나 $1$인 평면이다. 따라서 이것을 클립 좌표계로 표현하면 $\frac{x}{w} = 1$이며, 이는 $w = x$를 의미한다.
- 따라서 다음과 같은 식을 사용해서 잘라내는 영역을 파악할 수 있겠다.
$$ \frac{x}{w} > 1 $$ $$ \therefore x > w $$
- 잘라낼 평면 상에 위치한 점의 좌표를 계산하는 방법도 변경된다.
- 점 $P_1$, $P_2$의 $x$값을 각각 $x_1$, $x_2$로 지정하고, 잘라내는 점의 $x$값을 $x_{c1}$이라고 할 때 $x_{c1}$을 구하는 수식은 다음과 같다.
$$ x_{c1} = x_1(1 - t_1) + x_2 t_1 $$
- 이것은 $w$값에 대해서도 동일하게 성립된다.
$$ w_{c1} = w_1(1- t_1) + w_2t_1 $$
- 오른쪽 절두체 평면에서는 $x$, $w$값이 동일하므로 다음과 같이 구할 수 있다.
$$ x_1(1 - t_1) + x_2 t_1 = w_1(1- t_1) + w_2t_1 $$ $$ t_1 = \frac{(w_1 - x_1)}{(w_1 - x_1) - (w_2 - x_2)} $$
- 따라서 다음과 같이 각 평면에 대한 방정식을 정리할 수 있겠다.
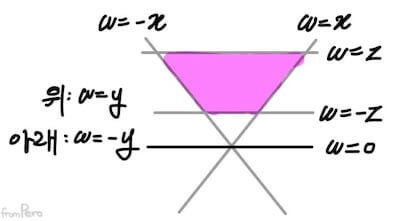
- 각 평면의 방정식과 외부 영역에 대한 판별식, 그리고 아핀 결합의 계수를 구하는 수식은 다음과 같다.
| 순서 | 평면 | 외부 판별식 | 아핀 결합의 계수 |
|---|---|---|---|
| 1 | $w = 0$ | $w<0$ | $$\frac{w_1}{w_1 - w_2}$$ |
| 2 | $w = y$ | $y>w$ | $$\frac{(w_1 - y_1)}{(w_1 - y_1) - (w_2 - y_2)} $$ |
| 3 | $w = -y$ | $y<-w$ | $$\frac{(w_1 + y_1)}{(w_1 + y_1) - (w_2 + y_2)} $$ |
| 4 | $w = x$ | $x>w$ | $$\frac{(w_1 - x_1)}{(w_1 - x_1) - (w_2 - x_2)} $$ |
| 5 | $w = -x$ | $x<-w$ | $$\frac{(w_1 + x_1)}{(w_1 + x_1) - (w_2 + x_2)} $$ |
| 6 | $w = z$ | $z>w$ | $$\frac{(w_1 - z_1)}{(w_1 - z_1) - (w_2 - z_2)} $$ |
| 7 | $w = -z$ | $z<-w$ | $$\frac{(w_1 + z_1)}{(w_1 + z_1) - (w_2 + z_2)} $$ |
// w = 0
static auto TestFuncW0 = [](const Vertex3D& InVertex) {
    return InVertex.Position.W < 0.f;
};

static auto EdgeFuncW0 = [](const Vertex3D& InStartVertex, const Vertex3D& InEndVertex) {
    float p1 = InStartVertex.Position.W;
    float p2 = InEndVertex.Position.W;
    float t = p1 / (p1 - p2);
    return InStartVertex * (1.f - t) + InEndVertex * t;
};

// w = -y
static auto TestFuncNY = [](const Vertex3D& InVertex) {
    return InVertex.Position.Y < -InVertex.Position.W;
};

static auto EdgeFuncNY = [](const Vertex3D& InStartVertex, const Vertex3D& InEndVertex) {
    float p1 = InStartVertex.Position.W + InStartVertex.Position.Y;
    float p2 = InEndVertex.Position.W + InEndVertex.Position.Y;
    float t = p1 / (p1 - p2);
    return InStartVertex * (1.f - t) + InEndVertex * t;
};

// w = -z
static auto TestFuncNear = [](const Vertex3D& InVertex) {
    return InVertex.Position.Z < -InVertex.Position.W;
};

static auto EdgeFuncNear = [](const Vertex3D& InStartVertex, const Vertex3D& InEndVertex) {
    float p1 = InStartVertex.Position.W + InStartVertex.Position.Z;
    float p2 = InEndVertex.Position.W + InEndVertex.Position.Z;
    float t = p1 / (p1 - p2);
    return InStartVertex * (1.f - t) + InEndVertex * t;
};
struct PerspectiveTest
{
    std::function<bool(const Vertex3D& InVertex)> ClippingTestFunc;
    std::function<Vertex3D(const Vertex3D& InStartVertex, const Vertex3D& InEndVertex)> GetEdgeVertexFunc;
    std::array<bool, 3> TestResult;

    void ClipTriangles(std::vector<Vertex3D>& InTriangleVertices)
    {
        size_t nTriangles = InTriangleVertices.size() / 3;
        for (size_t ti = 0; ti < nTriangles; ++ti)
        {
            size_t si = ti * 3;
            size_t testNotPassedCount = 0;

            std::vector<Vertex3D> sub(InTriangleVertices.begin() + si, InTriangleVertices.begin() + si + 3);
            // 테스트에 실패한 점 정보 얻기
            for (size_t ix = 0; ix < 3; ++ix)
            {
                bool testResult = ClippingTestFunc(sub[ix]);
                TestResult[ix] = testResult;
                if (testResult) testNotPassedCount++;
            }

            GetNewVertices(sub, testNotPassedCount);

            // 카메라 뒤에 아무 점도 없다. -> 그린다.
            if (testNotPassedCount == 0)
            {
                continue;
            }
            // 한 개의 점이 카메라 뒤에 있다.
            else if (testNotPassedCount == 1)  // 삼각형 추가
            {
                DivideIntoTwoTriangles(InOutVertices, startIndex, nonPassCount);
            }
            // 두 개의 점이 카메라 뒤에 있다.
            else if (testNotPassedCount == 2) // 삼각형 정보 변경
            {
                ClipTriangle(InOutVertices, startIndex, nonPassCount);
            }
            // 세 개의 점이 카메라 뒤에 있다. -> 안 그린다.
            else
            {
                InTriangleVertices.erase(InTriangleVertices.begin() + si, InTriangleVertices.begin() + si + 3);
                nTriangles--;
                ti--;
            }
        }
    }

private:

    // 점 하나가 평면의 바깥에 있어 삼각형이 2개로 쪼개지는 경우
    void DivideIntoTwoTriangles(std::vector<Vertex3D>& InOutVertices, size_t StartIndex, size_t NonPassCount)
    {
        // 평면의 바깥에 위치한 점 찾기
        BYTE index = 0;
        if (!TestResult[0])
        {
            index = TestResult[1] ? 1 : 2;
        }

        size_t v1Index = StartIndex + (index + 1) % 3;
        size_t v2Index = StartIndex + (index + 2) % 3;

        // 안 쪽의 점 두 개
        Vertex3D v1 = InOutVertices[v1Index];
        Vertex3D v2 = InOutVertices[v2Index];

        // 교차 지점
        Vertex3D clipped1 = GetEdgeVertexFunc(InOutVertices[StartIndex + index], v1);
        Vertex3D clipped2 = GetEdgeVertexFunc(InOutVertices[StartIndex + index], v2);

        InOutVertices[StartIndex] = clipped1;
        InOutVertices[StartIndex + 1] = v1;
        InOutVertices[StartIndex + 2] = v2;
        InOutVertices.push_back(clipped1);
        InOutVertices.push_back(v2);
        InOutVertices.push_back(clipped2);
    }

    // 점 두 개가 평면의 바깥에 있어 삼각형의 두 점이 변하는 경우
    void ClipTriangle(std::vector<Vertex3D>& InOutVertices, size_t StartIndex, size_t NonPassCount)
    {
        // 평면의 안쪽에 위치한 점 찾기
        BYTE index = 0;
        if (TestResult[0])
        {
            index = !TestResult[1] ? 1 : 2;
        }

        size_t v1Index = StartIndex + (index + 1) % 3;
        size_t v2Index = StartIndex + (index + 2) % 3;

        // 바깥쪽 점 두 개
        Vertex3D v1 = InOutVertices[v1Index];
        Vertex3D v2 = InOutVertices[v2Index];

        // 교차 지점
        Vertex3D clipped1 = GetEdgeVertexFunc(InOutVertices[StartIndex + index], v1);
        Vertex3D clipped2 = GetEdgeVertexFunc(InOutVertices[StartIndex + index], v2);

        InOutVertices[v1Index] = clipped1;
        InOutVertices[v2Index] = clipped2;
    }
};
- 다음은 대형 평면 메시를 배치해서 원근 투영 문제를 발생시키고, 삼각형 클래핑을 통해 해결하는 코드이다.
// 메시를 그리는 함수
void SoftRenderer::DrawMesh3D(const Mesh& InMesh, const Matrix4x4& InMatrix, const LinearColor& InColor)
{
    size_t vertexCount = InMesh.GetVertices().size();
    size_t indexCount = InMesh.GetIndices().size();
    size_t triangleCount = indexCount / 3;

    // 렌더러가 사용할 정점 버퍼와 인덱스 버퍼로 변환
    std::vector<Vertex3D> vertices(vertexCount);
    std::vector<size_t> indice(InMesh.GetIndices());
    for (size_t vi = 0; vi < vertexCount; ++vi)
    {
        vertices[vi].Position = Vector4(InMesh.GetVertices()[vi]);

        if (InMesh.HasColor())
        {
            vertices[vi].Color = InMesh.GetColors()[vi];
        }

        if (InMesh.HasUV())
        {
            vertices[vi].UV = InMesh.GetUVs()[vi];
        }
    }

    // 정점 변환 진행
    VertexShader3D(vertices, InMatrix);

    // 삼각형 별로 그리기
    for (int ti = 0; ti < triangleCount; ++ti)
    {
        int bi0 = ti * 3, bi1 = ti * 3 + 1, bi2 = ti * 3 + 2;
        std::vector<Vertex3D> tvs = { vertices[indice[bi0]] , vertices[indice[bi1]] , vertices[indice[bi2]] };

        if (useHomogeneousClipping)
        {
            // 동차좌표계에서 클리핑을 위한 설정
            std::vector<PerspectiveTest> testPlanes = {
                { TestFuncW0, EdgeFuncW0 },
                { TestFuncNY, EdgeFuncNY },
                { TestFuncPY, EdgeFuncPY },
                { TestFuncNX, EdgeFuncNX },
                { TestFuncPX, EdgeFuncPX },
                { TestFuncFar, EdgeFuncFar },
                { TestFuncNear, EdgeFuncNear }
            };

            // 동차좌표계에서 클리핑 진행
            for (auto& p : testPlanes)
            {
                p.ClipTriangles(tvs);
            }
        }

        size_t triangles = tvs.size() / 3;
        for (size_t ti = 0; ti < triangles; ++ti)
        {
            size_t si = ti * 3;
            std::vector<Vertex3D> sub(tvs.begin() + si, tvs.begin() + si + 3);
            DrawTriangle3D(sub, InColor, FillMode::Color);
        }
    }
}